When the floor starts peeling for no obvious reason
You had your garage floor coated six months ago. Maybe a year. The coating looked great at first. Now there are bubbles. Sections are lifting. Chunks are peeling up and you can see the bare concrete underneath.
The most common cause of premature epoxy coating failure in San Diego is not poor-quality product and it is not the weather. It is moisture in the concrete slab that was never properly diagnosed or addressed before the coating went down.
This post explains how that happens, how to identify it, and what the fix looks like.
How moisture gets into a concrete slab
Concrete is porous. Water moves through it constantly, driven by vapor pressure. The ground beneath your garage slab contains water. That water wants to migrate upward through the slab and evaporate from the surface. Under normal conditions, it does this silently and you never notice.
The problem starts when you put a coating over the surface. Now the moisture has nowhere to go. It builds up at the interface between the concrete and the coating. The pressure created by trapped moisture vapor is enough to break the bond between the coating and the slab. The result is bubbling, delamination, and peeling.
This process is called moisture vapor transmission (MVT), and the rate at which it occurs is measured in pounds of moisture per 1,000 square feet per 24 hours. Coatings have a rated tolerance, typically three to five pounds for standard epoxy systems. When the MVT rate exceeds the coating’s tolerance, failure is a matter of when, not if.
Why San Diego is not immune to this problem
People assume San Diego’s dry climate means moisture is not a concern. That assumption has caused a lot of failed floors.
Coastal areas from Encinitas south through Chula Vista sit at relatively low elevation with higher ambient humidity and water tables that are often closer to the surface than people expect. Garages in older neighborhoods in National City, Lemon Grove, and La Mesa frequently sit on slabs with moisture issues that never caused problems until someone tried to coat them.
Inland areas like El Cajon, Santee, and Spring Valley can have their own moisture dynamics depending on the specific lot, drainage patterns, and the age of the slab. A slab poured decades ago may have settled, developed micro-cracks in the vapor barrier (if one was installed at all), or have a barrier that has simply degraded over time.
Age of the home matters. Many garages in San Diego County were built before vapor barriers under slabs were standard practice. If the slab was poured in the 1960s, 1970s, or even early 1980s, there may be no vapor barrier at all. Moisture moves freely from the soil into the concrete and upward.
How to test for moisture before coating
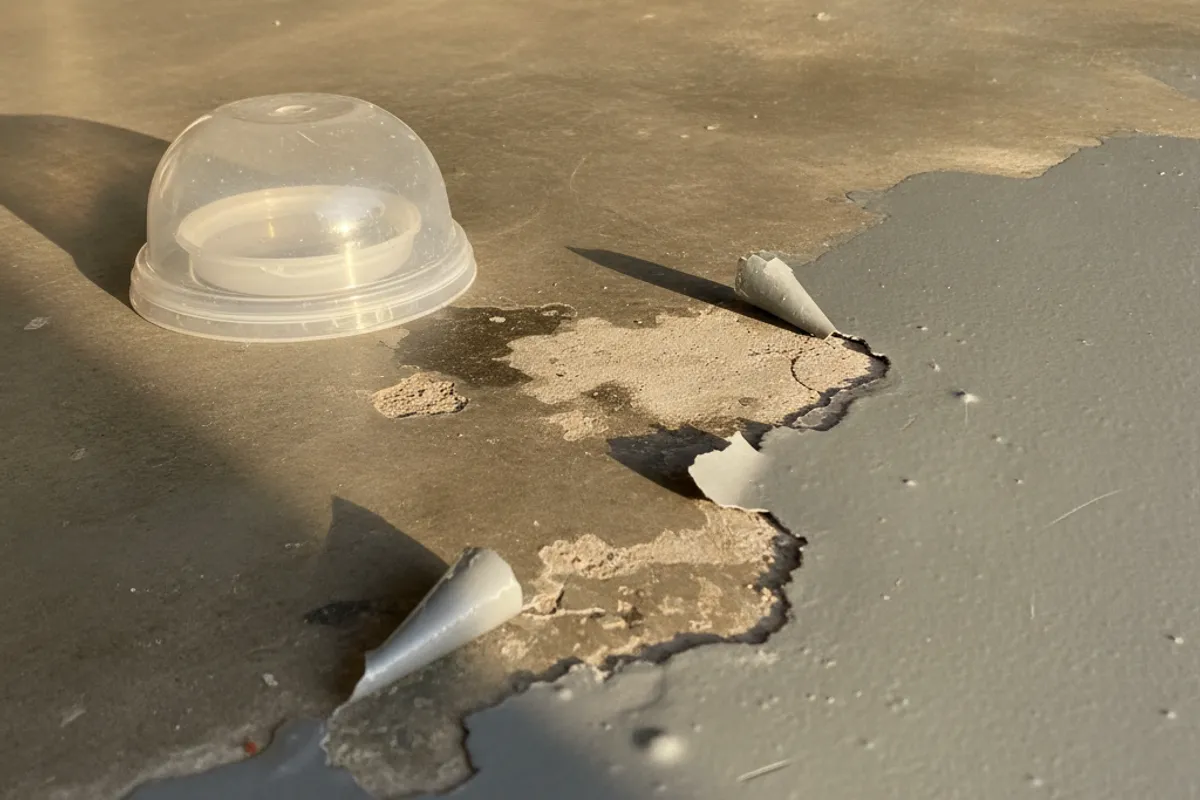
The standard field test for moisture vapor emission is the calcium chloride test. A small dish of calcium chloride is sealed under a plastic dome on the concrete surface for 60 to 72 hours. The amount of moisture the calcium chloride absorbs tells you the MVT rate in pounds per 1,000 square feet per 24 hours.
A faster and less precise option is the plastic sheet test. Tape a piece of plastic sheeting to the concrete, seal all edges, and leave it for 16 to 24 hours. If moisture forms under the plastic, the slab has some level of vapor transmission. This test does not give you a number, but it can indicate a problem quickly.
Professional installers use the calcium chloride test or a relative humidity probe test (ASTM F2170) before specifying a coating system. If they are not testing, ask why.
What happens when installers skip this step
Skipping moisture testing is a shortcut. It is common and it produces predictable results.
An installer who applies a standard epoxy system over a slab with elevated MVT will produce a floor that looks perfect on day one. The customer is satisfied. Then over the next few months, as the moisture continues to move and accumulates under the coating, bubbles begin to form. Small ones at first. Then larger sections lift. Then the coating is peeling.
At that point, the coating has to be removed entirely. The concrete has to be prepared again. The proper moisture mitigation system has to be installed before any new finish coating goes down. The job costs significantly more the second time.
If you are troubleshooting a failed floor right now, this is the most likely explanation.
The solution: moisture barrier coating
A moisture barrier coating is a specialized primer system applied directly to the concrete before the finish coating. It is formulated to tolerate high moisture vapor emission rates, typically up to 15 to 25 pounds depending on the product, far exceeding what a standard epoxy primer can handle.
The moisture barrier bonds to the concrete and creates a layer that can withstand the vapor pressure from below while still providing a surface that the finish coating can bond to from above.
There are two main types:
Epoxy moisture mitigation systems. Two-part epoxy formulations with high tolerance for moisture vapor. These are applied at a specific film thickness and must cure completely before the finish system goes on.
Polyurethane moisture barriers. More flexible than epoxy systems, which can be an advantage on slabs with minor movement or micro-cracking.
The right choice depends on the MVT rate and the finish coating being used. A qualified installer matches the system to the conditions.
What proper remediation looks like
If you already have a failed coating, here is what the repair process involves:
Step one: removal. The existing coating has to come off. Depending on how well it bonded in areas where moisture was lower, this can involve shot blasting or grinding. There is no shortcut.
Step two: surface preparation. The concrete gets ground or shot blasted to the appropriate surface profile. Concrete grinding and preparation is not optional. The surface profile has to be correct for the moisture barrier to bond properly.
Step three: moisture testing. Test before any new coating goes down. This time you need actual numbers, not assumptions.
Step four: moisture barrier application. The appropriate moisture mitigation system goes down and cures fully.
Step five: finish system. Now the epoxy coating or polyaspartic finish can be applied over a properly prepared and protected surface.
Preventing this on a new installation
If you are planning a garage floor coating and have not started yet, ask these questions before you hire anyone:
- What moisture testing will you perform before coating?
- What is your process if the test results show elevated moisture vapor emission?
- Do you include a moisture barrier primer as a standard part of your system, or is it an add-on?
A contractor who tests, discloses findings, and includes appropriate mitigation in the scope is doing the job correctly. A contractor who skips moisture testing is saving time at your expense.
A note on DIY and moisture
Box-store epoxy kits do not include moisture testing, and the instructions typically do not mention it. If you are considering a DIY installation on a slab that might have moisture issues, run the plastic sheet test first. If you see any condensation under the plastic, get a professional calcium chloride test before you proceed.
Applying a kit over a high-moisture slab is one of the most common ways DIY floors fail quickly.
Signs your existing floor may have a moisture problem
If you already have an epoxy or polyurea floor and are wondering whether moisture is at work, look for these patterns:
Bubbles or blisters. Small domed areas in the coating where it has lifted from the concrete beneath. The inside of the blister is often wet or shows a white mineral residue. This is a textbook moisture-vapor presentation.
Soft spots. Areas where the coating flexes slightly underfoot instead of feeling solid and hard. The coating is still attached but the bond is compromised.
Peeling at the perimeter. Moisture often enters slabs through the edges, near the perimeter walls. Peeling that starts at the edges and works inward is a strong indicator of moisture-driven failure.
Cloudiness or whitish haze. A milky appearance in sections of the coating, sometimes called blush, can indicate that moisture interfered with the curing process.
Fisheye patterns during application. If you watched the original installation, fisheyes or craters forming in the wet coating are often caused by moisture or contaminants on the concrete surface.
Any one of these is worth having looked at before you invest in a repair. The fix for a moisture-driven failure is different from the fix for a mechanical failure, and treating it the wrong way wastes money.
Get a proper assessment before your next coating project
Epoxy Coat SD refers homeowners across San Diego County to insured epoxy contractors who test for moisture and address it correctly before they coat. Epoxy Coat SD is a referral service, not a contractor. Verify any installer at cslb.ca.gov. Verify any contractor’s license status at cslb.ca.gov before signing.
If you are dealing with a failed floor or planning a new installation and want to make sure it is done right, call us at (858) 925-5546. We serve homeowners from Carlsbad and Oceanside in the north to Chula Vista and National City in the south, and everywhere in between.