The step most homeowners never see: why it determines everything
When a homeowner in Santee or Poway calls about a peeling epoxy floor, the conversation almost always traces back to the same place: the surface was not prepared correctly. The coating looked fine on day one. It started lifting within a year. And the root cause was what happened, or did not happen, before a single drop of epoxy touched the slab.
Concrete grinding is not glamorous. It generates dust, takes time, and adds cost. It is also the single variable that separates a floor that performs for a decade from one that fails within months. Understanding why this step matters this much will help you evaluate any contractor’s proposal before you commit.
What concrete grinding actually does
Raw concrete is porous but not uniform. The surface layer, called laitance, is a thin film of weak paste that forms as water bleeds upward during the curing process. This layer looks and feels like solid concrete, but it bonds poorly to coatings. If you apply epoxy on top of it, you are essentially gluing your coating to a fragile shell that can detach from the slab beneath.
Grinding removes that surface layer entirely. A professional-grade diamond grinder (not a rental sander, not acid etching alone) cuts through the laitance and opens the pores of the underlying aggregate. What you are left with is a clean, rough, mechanically receptive surface. Epoxy doesn’t just sit on top of this; it penetrates into the profile and forms a physical bond.
The technical term is “concrete surface profile,” or CSP. The International Concrete Repair Institute rates these profiles on a scale from CSP 1 (nearly smooth) to CSP 9 (deeply fractured). For a standard garage epoxy coating, contractors typically target CSP 3 to 4: a profile that looks and feels like fine sandpaper. Polyaspartic and thicker chip systems may require a slightly more open profile.
Why acid etching alone is not enough
Acid etching (applying a diluted muriatic acid solution to the floor) was the industry standard for decades and still gets used today. It does open the surface somewhat, but it has significant limitations.
First, acid etching cannot remove thick laitance or surface contamination reliably. Oil, tire rubber, and old paint residue resist acid. Second, etching leaves behind calcium salts that must be neutralized and rinsed thoroughly or they interfere with adhesion. Third, if the concrete has been sealed at any point, even years ago with a silicate product, acid does almost nothing to mechanical adhesion. The surface looks etched but the bond is compromised.
More importantly, acid etching produces a CSP of roughly 1 to 2. That is adequate for thin penetrating sealers but not for epoxy coatings that need a more open profile to achieve the tensile bond strength required to resist traffic, thermal cycling, and moisture vapor pressure.
What grinding looks like on a real San Diego job
A properly prepared garage in El Cajon or La Mesa starts with the contractor doing a moisture test. California garages, especially in older neighborhoods with original slabs, can push significant moisture vapor through the concrete. If moisture emission is high, a moisture barrier coating is applied before the epoxy layer. Skipping this step is a separate failure mode, but grinding still has to come first.
After moisture testing, the floor is inspected for cracks, chips, and low spots. Structural cracks are addressed with crack filler or polyurea joint compound. Spalled areas get repaired before grinding begins. You cannot grind your way out of a floor that needs garage floor repair, those issues have to be resolved first.
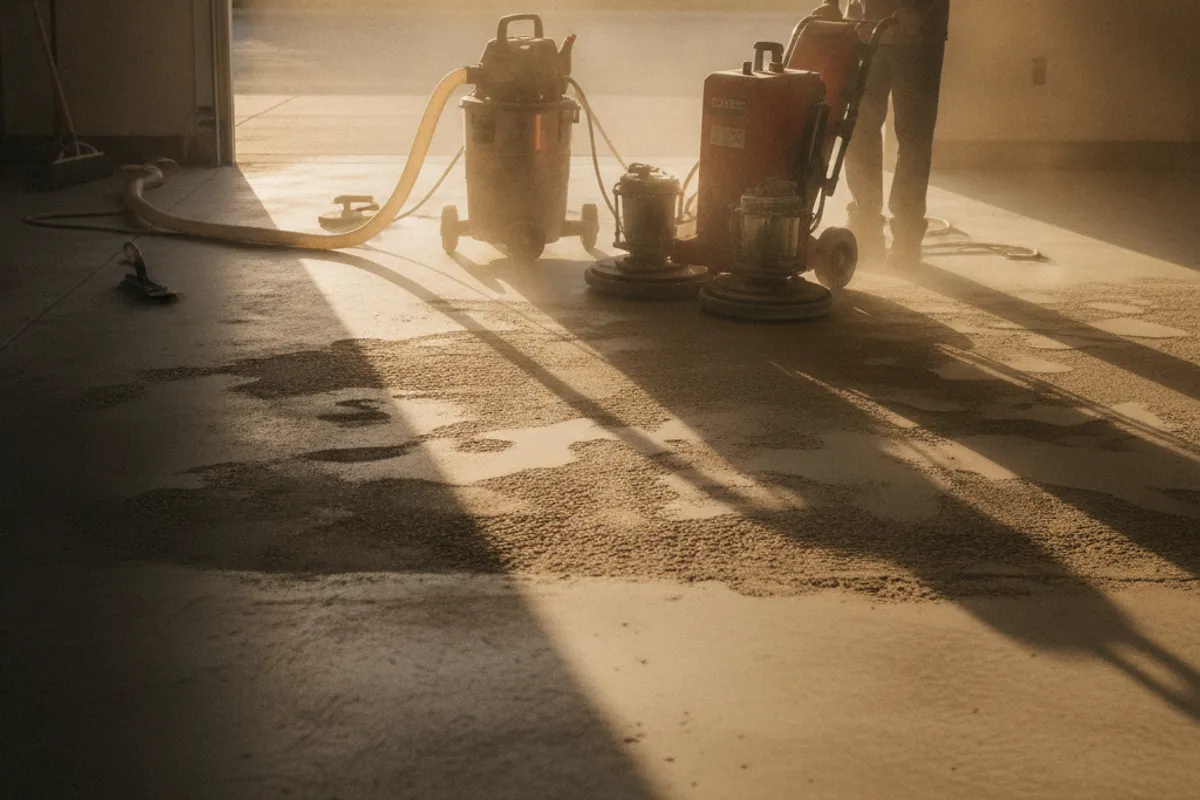
Then the grinding begins. On a standard two-car garage of 400 to 500 square feet, a single-pass grind with a walk-behind diamond grinder takes two to three hours. The contractor makes overlapping passes, typically in a diagonal or cross-hatch pattern, to ensure even material removal across the entire slab. Areas near walls and in corners require an angle grinder to reach.
Dust extraction matters here. Professional contractors run the grinder connected to an industrial HEPA vacuum. This keeps silica dust out of the air (a significant health concern) and keeps the ground surface visible so the operator can see exactly how much material is being removed.
After grinding, the floor is vacuumed and wiped down. A clean, open-profile slab has a pale matte appearance. You can see the aggregate texture clearly. That is what the epoxy is bonding to.
The difference in how long floors last
A properly ground slab gives epoxy a bond strength measured in hundreds of pounds per square inch. On a surface that was only acid-etched or, worse, not prepared at all, bond strength drops dramatically. The difference shows up in:
Delamination. Bubbles or sheets of coating lifting from the floor. Common in areas with tire traffic or where the slab experiences temperature swings, which is every garage in Escondido or Carlsbad that heats up in summer.
Hot tire pickup. Car tires get hot during driving and can create a suction effect when parked on epoxy. On a well-bonded floor, this is not an issue. On a poorly bonded floor, tires pull the coating up in strips.
Moisture failure. Even if the slab was dry on install day, vapor pressure is constant. A coating with a compromised bond eventually lifts as moisture vapor finds the weak interface between coating and concrete.
None of these failures are “epoxy failures” in the sense that the product itself broke down. They are prep failures. The epoxy did exactly what it was designed to do, it just had nothing solid to hold onto.
Evaluating a contractor’s prep process
When you get quotes from epoxy contractors in San Diego County, the prep process is one of the clearest signals of quality. Here is what to ask:
Ask how they prepare the surface. “We grind with diamond tooling” is the right answer. “We acid etch” or “we use a surface cleaner” is a flag worth pushing back on.
Ask what CSP they target for your specific coating system. A contractor who can answer this question in specifics knows what they are doing. One who responds with “we just prep it good” may not.
Ask whether they test for moisture before application. In communities like Spring Valley or Chula Vista where older slabs are common, this step is not optional.
Ask to see photos of a prepared floor from a recent job. The texture should be clearly visible and uniform. You should not see shiny spots, oil stains, or patchy areas.
Because Epoxy Coat SD connects homeowners with vetted local contractors rather than doing the work ourselves, Epoxy Coat SD is a referral service, not a contractor. Verify any installer at cslb.ca.gov. Always verify any contractor’s C-33 license at cslb.ca.gov before signing. What we do is match you with insured, experienced professionals whose prep process we know meets the standard described here.
Surface profile and coating type: matching the prep to the product
Not all epoxy coatings are the same, and prep requirements shift slightly depending on what goes on top.
A standard water-based epoxy, common in budget installations, requires less aggressive grinding because the coating itself is thinner and more flexible. It can get away with a CSP 2 to 3.
A high-build 100% solids epoxy, the kind used in most quality residential and commercial installations, needs CSP 3 to 4 to achieve the build thickness and bond strength those systems are designed for. See the options available in our epoxy coating service to understand what systems are typically used in San Diego garages.
Polyaspartic and polyaspartic coating systems (faster curing, UV-stable, increasingly common) have similar prep requirements but are much less forgiving of moisture issues. The cure happens so fast that any vapor in the slab gets trapped under the coating rather than evaporating through it. This makes thorough moisture testing even more critical with these systems.
Metallic epoxy systems, which produce the swirling, reflective finishes becoming popular in Encinitas and Rancho Santa Fe garages, require an especially clean and level surface because the metallic pigments flow during application and any surface irregularity shows up in the finished floor.
What you can do before the contractor arrives
There is not much a homeowner needs to do to prepare a concrete floor for a professional epoxy installation. That is the contractor’s job. But a few things help:
Clear the garage completely. Grinders and vacuums need full access to the slab. Partial clearing means partial prep.
Point out any areas of concern: cracks you have seen widen over time, stains from old oil spills, or any area that feels soft or hollow when you knock on it. The hollow sound, called delamination in the concrete itself, indicates a weak zone the contractor should address.
If you have been using a dehumidifier in the garage, keep it running for at least a week before the installation. Moisture levels matter.
Getting a quote from Epoxy Coat SD
If you are in the San Diego area, from Oceanside down through Chula Vista, and inland through Escondido, Santee, or El Cajon, Epoxy Coat SD can connect you with a contractor who will do the prep right. We do not cut corners on surface preparation because we have seen too many calls from homeowners who need their floor re-done after a bad first installation.
Call us at (858) 925-5546 to describe your project. We will ask the right questions, get you matched with an appropriate contractor, and make sure you know what to look for during the prep process on installation day.
A floor that is properly prepared does not need to be redone. That is the goal.